

In Part 1 of Beginners Guide to Oracle Content Management Sites Compilation blog you learned about basics of compiling sites that you created in Oracle Content Management (OCM) for delivery as HTML pages. In this blog we will look at how you can develop, debug and test compiled site before releasing it in production.
Develop, Debug and Test a Site
Let’s delve into how to develop, debug, and test a site in more detail, but before we do that, here are some things for you to consider:
- Developer productivity — When developing any OCM component, whether for rendering or compiling, you want to be as productive as possible. You should not use a model where you have to make a change, find where to upload the file, upload the file, wait for the upload, navigate back to the site, and refresh the page (even though this would work). At a minimum, you want to be able to edit your JavaScript and then save / refresh to see the change. Only once you have all the code as you want it, should you upload it to the server to validate in the full OCM server, your OCM instance.
- Node vs. browser environment — When creating a custom compiler, you’ll be writing a Node.js module. You need to be aware of the constraints when writing Node.js applications as Node.js modules do not have access to browser objects such as the DOM, window, or common browser libraries such as JQuery. Similarly, REST calls in Node.js and the web browser use different libraries and syntax. So any code using these types of objects in your renderer implementation will need to be translated to native “node” calls when you’re writing the compiler.
- Technology choice and common code — When developing component renderers and compilers you will, most likely, want to share as much code as possible. This impacts the choice of JavaScript technology as using any third-party JavaScript stack that renders elements dynamically in the browser will require special handling to make the same code work efficiently when you’re compiling the component into the page. For example, choosing a simple templating solution such as MustacheJS will allow you to share a lot of code, since it works when both compiling under Node.js and rendering directly in the browser. If you choose a sophisticated JavaScript stack, it may allow you to have advanced UI elements and user interaction when the page is run dynamically, but you’ll also need to work out how to have those elements compile directly into the page.
Development Flow
The easiest way to develop components is to start with the default implementation of the component in a basic site with the minimum set of resources required to render the component. For example, if you want to display a new content item of a new content type, you would perform these steps:
- Create the content type.
- Create a content layout component.
- Map the content layout component to a category in the content layout map for the content type.
- Create an item of this content type in the site’s repository.
- Edit your site and drop the item of the content type onto a page and select the content layout map category.
To further develop the content layout, you’d use the OCM Content Toolkit to leverage the work you’ve already done to render the content item onto the page:
- Commit your changes in the Site Builder web user interface.
- Then, using CLI commands in the toolkit:
- create a template from the site, which saves the site to the local file system, and
- use the local development server provided by the toolkit to render the site.
At this point, you have all the code on your files locally. You can change the source of the content layout you created and refresh the site that’s rendered by the site’s toolkit development server to see the changes. After you have made all the required changes locally, you can use the toolkit to upload the Content Layout component back to the Oracle Content Management server.
Follow the same development flow for creating custom compilers.
Develop Custom Compilers
In this example, we’ll develop compile for a custom component. All the custom compilers follow the same pattern. To get started, install the OCM Content Toolkit using the setup instructions on GitHub. After you are done, you should have:
- A ‘cec-src’ folder, which you need to be in to run the ‘cec’ commands.
- A registered server “DEV”, which allows you to connect to your Oracle Content Management instance and list available resources.
Once the folder has been created and the server connection established, you can download a site from the OCM server and compile it in the toolkit.
Create a Local Component
On the /documents/components page of your OCM web UI, create a local component named “SampleComponent” and choose Mustache as the component type (technology). After creating the component, click on the component and view its ‘assets’ folder. You’ll see the following files in this folder:
- SampleComponent
- /assets
- common.mjs — shared code between render.mjs & compile.mjs
- compile.mjs — sample custom component compiler
- render.js — wrapper for when component is included in the page using RequireJS
- render.mjs — renders the component dynamically into the page
- template.html — shared template used by common.mjs
- /assets
The seeded compile.mjs file contains a basic implementation of the component custom compiler that matches the default render.mjs file.
Create a Basic Site and Add the Local Component
Next, create an enterprise site called “StaticSite” using the ‘Blank’ or ‘Starter’ template. Edit the site, update the home page and add the “SampleComponent” to the page. Save and commit your changes.
Download the Site to the Content Toolkit
Assuming you registered a server “DEV” while installing the Content Toolkit, run the following command to download the site to the toolkit folder:
cec create-template StaticSite --site StaticSite --server DEV --excludecontent
If you get the following error, you can remove the existing template by removing or renaming the folder under cec-src/src/templates/StaticSite and run the command again.
ERROR: A template with the name StaticSite already exists. Please specify a different name. |
Compile Your Site
Now that you have the site locally, you can compile it:
cec compile-template StaticSite --verbose
When you compile the site, you’ll see the following warning message from the SampleComponent’s compile.mjs file:
Warning: the custom compile() function has not been implemented in: file:///.../cec-src/src/components/SampleComponent/assets/compile.mjs |
This message is returned by the SampleComponent compile.mjs file to let you know that you need to update the file to make sure it is in sync with any changes to your render.mjs file. You need to keep both these files in sync to ensure that the user sees the same content regardless of whether the component is rendered dynamically or statically.
Dynamic Component in Compile Page
If you now open up the compiled page for the site, you’ll see that the component is still rendered dynamically, even though the page has been compiled. To view the page, start the toolkit development server, if it’s not already started:
cec develop
Open your web browser and view the compiled home page:
http://localhost:8085/templates/StaticSite/home.html
If you right-click anywhere on the page and choose to view the page source, you’ll see the slots on the page, but no content for the SampleComponent you created. The SampleComponent is being added to the page dynamically after the page is loaded. You can see the component in the page by right-clicking any part of the rendered SampleComponent and choosing to inspect that component.
The reason the component is not being compiled into the page and instead is being rendered dynamically is that the compile.mjs file currently doesn’t return any content for the component.
Static Component in Compile Page
If you open up the src/components/SampleComponent/assets/compile.mjs file in an editor, you’ll see the following entry:
if (false) {
    // return the generated HTML and use hydrate in the render.js file to add any event handlers at runtime
    return resolve({
        hydrate: true,
        content: componentHTML
    });
} else {
    // warn the user that the compile function hasn't been implemented
    console.log('Warning: the custom compile() function has not been implemented in: ' + import.meta.url);

    // If the compile() function doesn't return any content, then the component will execute dynamically at runtime
    return resolve({});
}
To remove the warning and instead return the compiled HTML for the component so that it renders statically in the compiled page, change the “if (false)” statement to “if (true)”, save the file, and then re-compile the site:
cec compile-template StaticSite --verbose
This time you won’t see the warning message. Open your web browser and view the compiled home page:
http://localhost:8085/templates/StaticSite/home.html
Right-click anywhere on the page and choose to view the page source. Now you’ll see the SampleComponent HTML code inserted into the compiled page.
Debug Custom Compilers
Debugging Node.js applications is very similar to debugging browser applications. To debug a Node.js application, you can use the same web developer tools that you’d use when debugging JavaScript within a web browser. For more details on the options for debugging Node.js application, you can review the Node.js documentation.
To enable debugging of ‘cec’ commands, there’s a --debug parameter. This will start the Node.js application in --inspect-brk , which means the debugger will break before user code starts and wait until the debugger is attached. Once the debugger has been attached, you can enter breakpoints and continue debugging as you would any JavaScript code and then click on Resume to start executing the code.
Connect to the Debugger
To start debugging your component, start the complication command in debug mode:
cec compile-template StaticSite --verbose --debug
The output from this will look something like below, and it will stop until the debugger is connected:
Debugger listening on ws://127.0.0.1:9229/0545c509-cc26-4c3c-966e-e0d1b5ddd56eFor help, see: https://nodejs.org/en/docs/inspector |
To connect your debugger, bring up Google Chrome and enter the following URL
chrome://inspect
The browser will display the ‘cec’ command as a gulp.js entry in the Remote Target section.
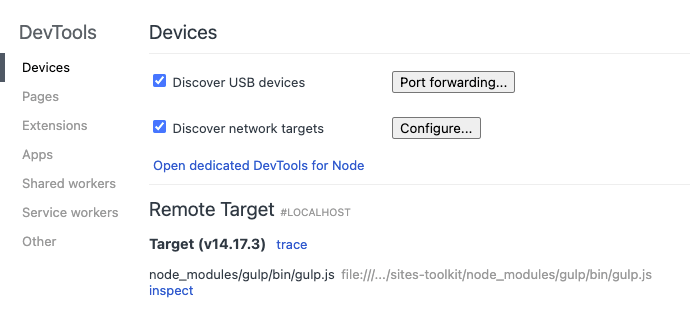
If you click on the inspect link, it will bring up the Chrome Developer Tools with the debugger paused at the beginning of the cec compile-template command. In the debugger, if you click on the “resume” option, the compile will run through and complete.
Break in Your Custom Compiler
Using the “Filesystem” entry in the source tab of Chrome Developer Tools, you could navigate until you find your component and then put a break point within the component. A simpler way to make sure the debugger stops in your custom component is to add the debugger; command to your compile.mjs file. Update the compile.mjs file for your custom component and add the debugger; command to the the compile() method:

Re-run the compile-template command with the debugger:
cec compile-template StaticSite --verbose --debug
Go back to the Chrome browser and click on the inspect link, which will automatically reappear on the chrome://inspect page. Click resume in the debugger and the compile-template command will start and it will stop on your debugger; breakpoint.

The same pattern can be used for all custom compilers.
Test Compiled Pages
Minimize Compilation Time
During the develop / debug / test cycle, you want the fastest turnaround time. You don’t want to wait for the entire site to be compiled to validate your changes. In the example so far, there’s only one language and a few pages, so compiling the entire site has not been an issue. As your site grows, you may want to focus only on specific languages or pages for validating your component.
To restrict the list of pages that will be compiled, you can use the --pages option. This option restricts the page that will be compiled to the selected set. For most component development, this should be a single page.
cec compile-template StaticSite --verbose --pages 10,12
To restrict the list of languages that are compiled, you can use the --localeGroup option. This option will limit the compilation to only the selected languages.
cec compile-template StaticSite --verbose --localeGroup en-US,de-DE
Combining these options will allow you to validate all your changes on a few select pages before you kick off the complete site compilation to generate all the static files for your site.
Preview URLs
When you compiled your template, you may have seen the following output showing a preview URL:
createPage: Processing pageId 12. Preview URL: http://localhost:8085/templates/StaticSite/home.html |
The preview URL uses the local development server that comes with the Content Toolkit. To start up the development server, run this command:
cec develop
After the server is up and running, you can enter the preview URL in the browser and see the compiled page. If you view the page source in your web browser, you’ll see your custom component compiled into the page.
Local Development Server and Compiled vs. Controller Pages
When you access a page in the development server, the server will return the compiled page. If the compiled page doesn’t exist, it will fallback to controller page i.e., to loading controller.html file, which will run the page dynamically. If you do want to see the controller pages, then you need to remove the ‘static’ folder from under your template folder. In this example, we’re using the template named “StaticSite” so, to render the controller pages, you would remove the files under:
src/templates/StaticSite/static
Content
The examples so far have only considered custom component compilers. If you want to build custom content compilers, you need to consider how to access the content. When you create a template using the Content Toolkit, you have the option of downloading the content as part of the template. However, while there’s some basic support for querying that content using the local development server, the local development server is not a replacement for the actual Oracle Content Management server and does not support all REST APIs for content.
In most cases, the better option is to exclude the content when downloading the template. To exclude the content when creating the template, use the --excludecontent parameter:
cec create-template StaticSite --site StaticSite --server DEV --excludecontent
Now, in order to access the content, you need to provide both the server and channel token when compiling a template. To get the channel token, you can select the API property against the Publishing Channel for your site. In the OCM web UI, navigate to Administration > Content > Publishing Channels. Once you have the channel token, you can compile the template with these values:
cec compile-template StaticSite --verbose --server DEV --channelToken df5d1d4c1a8e4d77b7c7e54ab016843e
All REST API calls to get content will now be made back to the server using the given channel token.
Published vs. Draft Content
By default, both the create-template and compile-template commands will use the draft version of the site and content. Please note the following:
- To download the published version of the site, use the
--publishedversionoption. This will ignore any unpublished changes to the site, theme, and components when creating the template and download the published files only. - To use published content during compile, use the
--type publishedcommand-line option. This will use the content delivery REST API calls.
That is it for the Part 2. In Part 3 of the Beginner’s Guide to Site Compilation you will learn about uploading and publishing compiled HTML files to the site runtime.
