
Creating a new site template in Oracle Sites Cloud Service (SCS) is easy – you can simply select an existing site in the Manager UI and then save it as a new template. However, what if you want to create a template that will be based on a site created using a brand new theme that you want to develop at the same time. In this post I will guide you step-by-step through creating a new theme that you can then use to create a new site and template.
Step 1: Get a Bootstrap Theme
You can develop a new theme using HTML cut that you received from a web design agency or a Bootstrap theme that your found on the Web. To follow instructions in this document you will use Bootstrap theme Modern Business as an example to create new SCS theme. You can download this theme from here.
Step 2: Create a New Site using Starter Template
Login on your tenant service, navigate to Experiences > Templates and then create new Site using StarterTemplate. When prompted, enter ‘ModernBusiness’ as the name for the new site.

After site creation is completed, you will see new site ModernBusiness on the list of Sites and new theme ModernBusinessTheme on the list of Themes. If you check ModernBusiness site Properties, you will see that this site was created using ModernBusinessTheme as a theme.
Note: StarterTemplate behaves differently from any other Template – each site created from the StarterTemplate gets a new theme, sites created from any other Template always share the theme that this Template contains.


Step 3: Sync ModernBusinessTheme to Desktop
After new theme has been created, you should see it on the list of items available for sync in Oracle Documents Sync Manager desktop client:

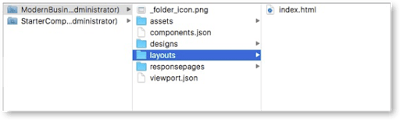
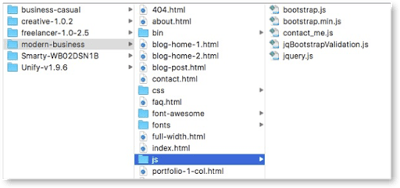
Select ModernBusinessTheme and sync it to desktop. After sync is complete, review folder structure of SCS theme. Note, that SCS theme has a top level folder ‘assets’ that contains CSS, JS and other static files, and top level folder ‘layouts’ with page layouts that are used in the theme. A Bootstrap theme or HTML files that you received from design agency will likely use a different folder structure, for example ‘Modern Business’ theme contains all HTML files in the top level folder with static assets in sub-folders.
SCS ModernBusinessTheme Layout
Bootstrap Theme ‘Modern Business’
Step 4: Convert Bootstrap theme to use SCS theme layout
On this step you will first convert the ‘Modern Business’ theme to use the same folder structure as required for SCS theme:
- Create a new folder on desktop, e.g. ‘modern-business’ folder
- Create ‘modern-business/assets’ and ‘modern-business/layouts’ sub-folders
- Copy HTML files that you plan to convert into SCS page layouts to the ‘layouts’ folder
- Copy ‘css’, ‘js’ and other folders with static files to the ‘assets’ folder
Once done, you should see something like screenshot below:

Note:
- Bootstrap theme typically contains a large number of sample HTML pages. You should review these pages first to decide what HTML files you will include into your SCS theme as page layouts.
- Bootstrap theme can include other files that are not relevant for SCS theme and should not be included into it. For example, ‘Modern Business’ theme includes ‘bin’ folder with PHP files to support Contact Me form.
Next, you need to modify HTML files that you copied to ‘modern-business/layouts’ folder to use a different path to static resources. In a typical Bootstrap theme you simply need to change ‘assets/’ to ‘../assets/’ in the files. In case of ‘Modern Business’ theme you need to change:
- ‘css/’ to ‘../assets/css’
- ‘font-awesome/’ to ‘../assets/css/font-awesome/’
- ‘fonts/’ to ‘../assets/css/fonts/’
- and ‘js/’ to ‘../assets/js’
Checkpoint 1
Open modified HTML files in the browser and confirm that all files render correctly. If you decided to use all HTML files in the ‘Modern Business’ theme in your SCS theme, open ‘layouts/index.html’ file in the browser – you should be able to navigate the site and see all the site pages rendered correctly.
Now you are ready to proceed to adding files from Bootstrap theme to the SCS theme. I will describe next step in Part 2 of this blog post.

2 Comments